
This post contains affiliate links. If you buy through our links, we may earn a small commission at no extra cost to you.
Replacing a ceiling light fixture is one of the most approachable electrical DIY jobs — no special license, no running new wire, just disconnecting the old fixture and connecting the new one to the existing wires. Most homeowners finish in under an hour.
The most important part isn’t the wiring — it’s confirming the power is off before you touch anything. Get that right and the rest is straightforward.
Quick answer: Turn off the breaker, verify power is off with a non-contact voltage tester, remove the old fixture, match wire colors (black to black, white to white, bare copper to green/bare), connect with wire nuts, tuck wires into the box, and mount the new fixture. Test before putting bulbs in.
What You’ll Need
- Non-contact voltage tester — mandatory for safety
- Flathead and Phillips screwdrivers
- Wire stripper (if needed — new fixtures usually come with pre-stripped wires)
- Wire nuts / connectors — usually included with the fixture
- Needle-nose pliers
- Ladder — tall enough to work comfortably at ceiling height
- Electrical tape (optional — for extra security on wire connections)
- New ceiling light fixture
🔗 Our Top Pick: Klein Tools Non-Contact Voltage Tester (Amazon)
🔗 Our Top Pick: Ideal Wire Connector Assortment (Amazon)
🔗 Our Top Pick: Hykolity LED Flush Mount Ceiling Light (Amazon)
⚠️ A non-contact voltage tester is not optional. It’s a $15–$20 tool that tells you whether a wire is live without touching it. Working on live wires causes serious injury or death. Buy one before starting this project.
Safety First: Turn Off the Power
Go to your electrical panel. Find the breaker that controls the room or circuit where the light fixture is. Flip it to the OFF position.
Test the switch. Go back to the room and try the light switch. If the light doesn’t come on (or was already off), that’s a good sign — but not enough confirmation on its own.
Verify with a voltage tester. Remove the light fixture cover or globe if possible, and hold the non-contact voltage tester near the wires or socket. A live wire will make the tester beep and light up. No beep = power is off. This is the only confirmation that matters.
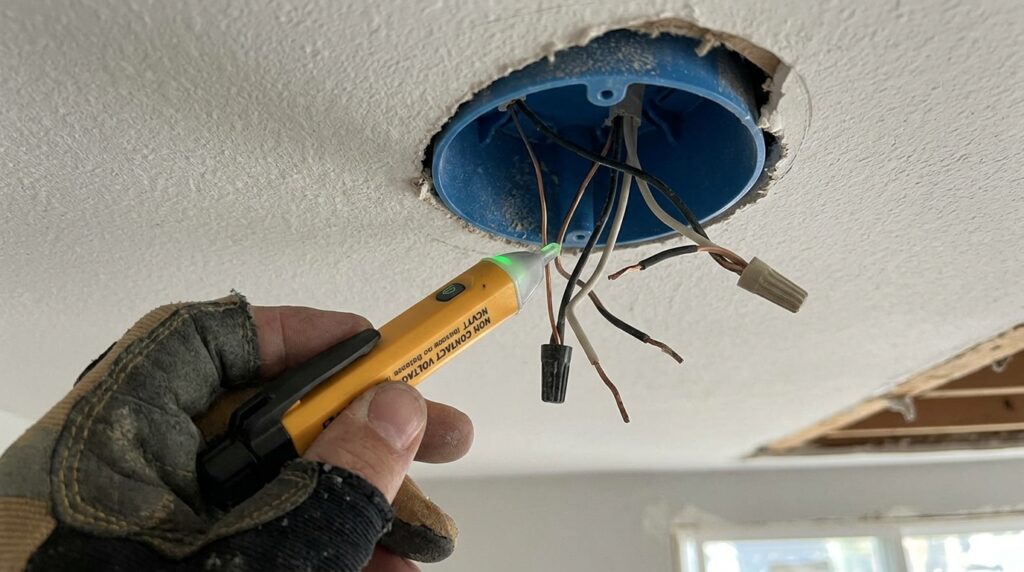
Turn off the switch too. Even with the breaker off, turn the wall switch to OFF. This is an extra precaution and helps when you test the fixture at the end.
⚠️ Never assume the power is off because you flipped a breaker. Breakers are sometimes mislabeled. Always confirm with a voltage tester on the actual wires before touching anything. This step takes 30 seconds and is non-negotiable.
Step 1: Remove the Old Fixture
Remove the globe, shade, or cover. Most fixtures have a decorative cover held by a center nut, screws, or a twist-lock. Remove it to expose the mounting hardware and wiring.
Support the fixture as you unscrew. Have a helper hold the fixture or use one hand to support it while you unscrew the mounting screws with the other. Fixtures can be heavier than expected — letting one drop can damage the junction box or injure someone below.
Lower the fixture carefully. Once the mounting screws are out, the fixture will hang by its wires. Lower it slowly — don’t pull hard on the wires.
Photograph the existing wiring before disconnecting. Take a clear photo of how the wires are connected. This is your reference if anything gets confusing during installation.
Unscrew the wire nuts and disconnect. Twist the wire nuts counterclockwise to remove them. Untwist the wire pairs and set the old fixture aside.
💡 Pro tip: If the old fixture is heavy (like a chandelier), a piece of wire bent into an S-hook hung from the junction box can hold the fixture while you work on the wiring — keeps it from hanging by the wires.
Step 2: Identify the Wires
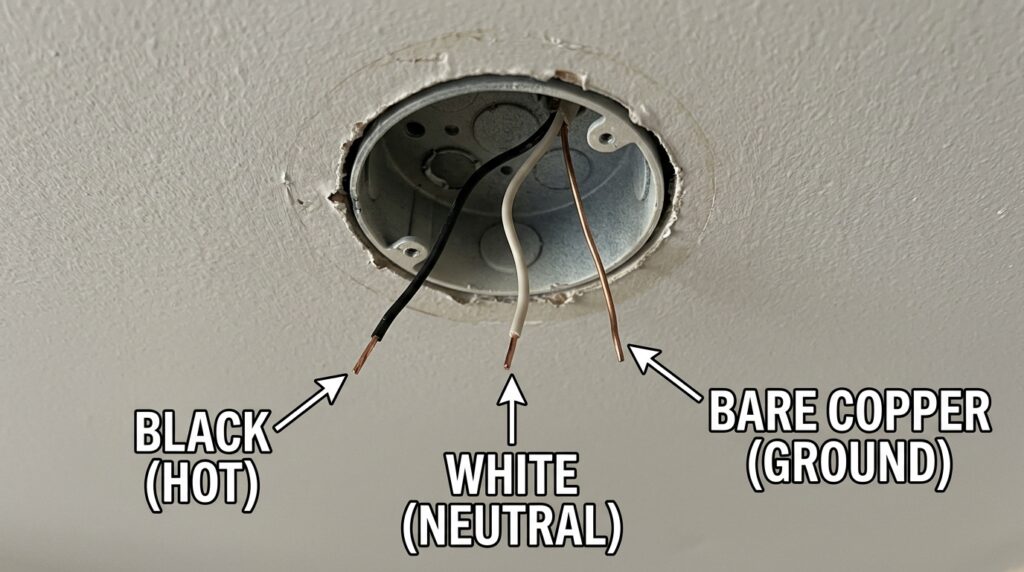
Standard residential ceiling fixtures involve three wires. Knowing which is which is essential before making any connections.
| Wire color | Function | Connects to |
| Black | Hot (live) wire — carries current to fixture | Black wire on new fixture |
| White | Neutral wire — completes the circuit | White wire on new fixture |
| Bare copper or green | Ground wire — safety ground | Green screw or bare wire on new fixture |
What if wires are different colors? In older homes, wiring may use different colors. If you see two black wires, use your voltage tester: with power restored at the breaker (but switch OFF), one wire will be live (the hot) and one won’t (the switched leg). Mark the hot wire with tape before turning the breaker off again.
What if there’s no ground wire? Older homes sometimes have no ground wire in the junction box. Connect the black and white wires normally. Cap the green ground wire from the new fixture with a wire nut — don’t leave it exposed.
⚠️ If you see more than three wires in the junction box, or the wiring doesn’t match the standard color code, stop and call an electrician. Multiple wires usually means the box is on a switch loop or controls other fixtures — more complex than a simple replacement.
Step 3: Connect the New Fixture
Read the fixture’s instructions first. Every fixture includes a wiring diagram. Follow it — especially for fixtures with multiple bulbs, dimmers, or special wiring requirements.
Assemble the mounting bracket. Most new fixtures include a mounting bracket that attaches to the junction box. Secure it to the box with the provided screws before connecting wires — it gives you something to hang the fixture from while you work.
Connect black to black. Hold the black wire from the ceiling and the black wire from the fixture together, twist clockwise until the bare wire ends are tight, then screw a wire nut clockwise over the twisted pair. Tug gently to confirm the connection is secure.
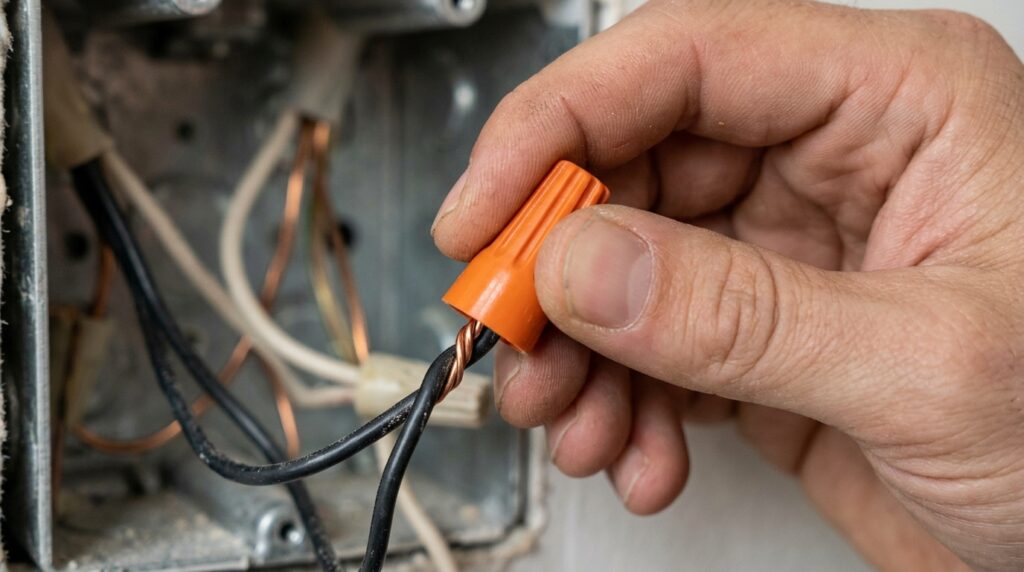
Connect white to white. Same process — ceiling white to fixture white, twist, wire nut. Tug test.
Connect the ground. Connect the bare copper or green wire from the ceiling to the green screw on the mounting bracket or to the green/bare wire from the fixture. If connecting wire to wire, use a wire nut. If connecting to a screw, wrap clockwise and tighten.
Wrap with electrical tape (optional). Wrap each wire nut connection with a few wraps of electrical tape for extra security. This is standard practice for overhead fixtures where a loose connection could cause a fixture to fall.
💡 Pro tip: When twisting wire pairs together before adding a wire nut, the goal is 3–4 tight clockwise twists of the bare wire ends. The wire nut then goes over the twisted pair — it’s not the twist that holds the connection, it’s the nut.
Step 4: Mount and Finish
Tuck wires into the junction box. Fold the connected wires carefully into the junction box. Don’t cram them in — fold them in a figure-8 pattern so they lie flat. Wires that press against the fixture base can cause buzzing or heat buildup.
Attach the fixture to the mounting bracket. Most fixtures attach with a center threaded rod (nipple) and a decorative nut, or with two mounting screws. Follow your fixture’s specific hardware.
Secure the canopy or base plate. The decorative canopy or base plate covers the junction box and mounting hardware. Slide it up and tighten the securing nut or screws until snug — not overtightened, which can crack the fixture.
Install bulbs. Check the fixture’s maximum wattage rating before installing bulbs. LED bulbs are recommended — they run cooler, last longer, and use less power.
Test before finishing. Turn the breaker back on and test the switch. If the light works, turn the switch off, confirm it off with the voltage tester, then attach any remaining decorative elements like globes or shades.
⚠️ Check the fixture’s weight rating against your junction box. Standard junction boxes are rated for 35 lbs. Heavy fixtures (chandeliers, heavy pendants) require a fan-rated box rated for 50 lbs or more. If in doubt, replace the junction box before installing a heavy fixture.
When to Call an Electrician
Installing a ceiling fixture is a straightforward DIY job in most cases. Call an electrician when:
- You find more than 3 wires in the junction box and aren’t sure which to connect
- The wiring uses non-standard colors or you can’t identify hot and neutral
- The junction box is loose, damaged, or not properly secured to a joist or brace
- You want to add a new fixture where there’s currently no wiring
- The circuit breaker trips when you turn the light on after installation
- You’re installing a fixture over 35 lbs and the box isn’t fan-rated
Frequently Asked Questions
Do I need an electrician to replace a ceiling light fixture?
No — replacing an existing fixture with a new one at the same location is a standard DIY job that doesn’t require an electrician or permit in most jurisdictions. Adding a new fixture where there’s no existing wiring does require an electrician and usually a permit. If you’re simply swapping one fixture for another, you can do it yourself.
What if my new fixture has a blue wire?
Some fixtures — especially those designed for use with fans or dimmers — include a blue wire. Blue is typically used as a second switched hot wire (for a separate control, like a fan speed vs. light). For a basic light replacement, connect blue to black along with the black ceiling wire. If the fixture instructions say otherwise, follow them.
Can I install a heavier fixture than what was there before?
Only if the junction box is rated for the weight. Standard plastic boxes handle up to 35 lbs. Metal fan-rated boxes handle 50 lbs. For very heavy fixtures like large chandeliers, a brace bar installed between joists may be needed. Check the fixture weight against the box rating before buying.
The light flickers after installation — what’s wrong?
Flickering usually means a loose wire connection. Turn off the breaker, remove the fixture, and check every wire nut — tug each connection firmly. Re-twist any loose pairs and replace the wire nut. Also check that the bulb is fully seated. If flickering continues, the issue may be a loose connection elsewhere in the circuit — call an electrician.
Can I install a dimmer switch with any ceiling fixture?
Not all fixtures are dimmer-compatible. LED fixtures must be specifically labeled as dimmable — non-dimmable LEDs flicker or buzz on a dimmer circuit. Incandescent and halogen fixtures work with standard dimmers. Check the fixture and bulb packaging for dimmer compatibility before buying a dimmer switch.
The Bottom Line
Installing a ceiling light fixture is one of the most manageable electrical DIY projects — it involves no new wiring, no permits, and no special skills. The process is: power off, verify with a tester, remove old fixture, connect matching wire colors, mount the new fixture, test.
The one tool that makes this job safe is a non-contact voltage tester. It costs $15–$20 and eliminates the risk of working on a live wire. Buy one before starting, and use it every time you work near electrical wires.
Related posts (internal links):