
This post contains affiliate links. If you buy through our links, we may earn a small commission at no extra cost to you.
Replacing a bathroom faucet is one of the most satisfying DIY plumbing jobs — visible results, no special skills required, and it typically takes under two hours. A plumber charges $150–$300 for this job. You can do it yourself for the cost of the faucet.
The process is the same whether you’re replacing a single-handle or double-handle faucet: shut off the water, disconnect the old faucet, clean the sink, install the new one, connect supply lines, and test. That’s it.
Here’s exactly how to do it.
Quick answer: Turn off the hot and cold supply valves under the sink, disconnect the supply lines and drain linkage, remove the mounting nuts holding the old faucet, clean the sink surface, install the new faucet following its included instructions, reconnect supply lines with new braided lines, turn the water back on slowly, and check every connection for leaks.
What You’ll Need
- Adjustable wrench or basin wrench — a basin wrench is essential for reaching nuts in tight spaces
- Pliers (channel-lock / slip-joint)
- Bucket and towels — for water that drains from the lines
- Plumber’s tape (Teflon tape) — for threaded connections
- Utility knife or putty knife — for removing old plumber’s putty or caulk
- Flashlight or headlamp — under-sink work is dark
- New faucet (with all hardware)
- New flexible supply lines — always replace these; old lines crack and fail
🔗 Our Top Pick: Moen Adler Single-Handle Bathroom Faucet (Amazon)
🔗 Our Top Pick: FlexPlus Braided Stainless Supply Lines (Amazon)
🔗 Our Top Pick: Teflon Plumber’s Tape (Amazon)
💡 Pro tip: Read your new faucet’s installation instructions before starting. Most modern faucets include a deck plate for 3-hole sinks and detailed instructions — they vary enough that the manufacturer’s guide is your best reference for the final installation.
Step 1: Turn Off the Water and Prep the Area
Turn off the supply valves. Look under the sink for two valves — one for hot (left) and one for cold (right). Turn them clockwise until they stop. If the valves are stiff or won’t close fully, turn off the main water supply to the house instead.
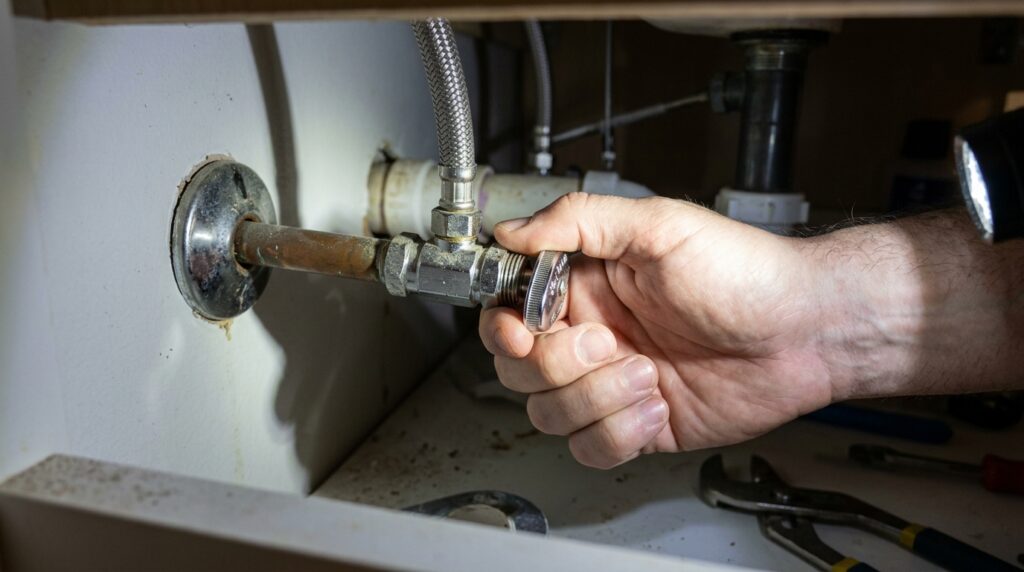
Test that water is off. Turn on the faucet and let it run until no more water flows. This also relieves pressure in the lines.
Place a bucket under the supply lines. When you disconnect the lines, residual water will drain out. A small bucket or folded towels prevent a mess.
Clear out under the sink. Remove everything stored under the sink — you’ll need room to maneuver. Put down a towel or drop cloth to protect the cabinet floor.
⚠️ If the shutoff valves under the sink haven’t been turned in years, they may be corroded and difficult to close — or may drip after closing. Turn them slowly and carefully. If a valve won’t close or starts leaking, shut off the main water supply to the house before proceeding.
Step 2: Remove the Old Faucet
Disconnect the supply lines. Use an adjustable wrench to unscrew the supply lines from the shutoff valves (bottom) and from the faucet tailpieces (top). Have your bucket ready — water will drain from the lines.
Disconnect the drain linkage. Most bathroom faucets include a pop-up drain assembly connected to the faucet body by a pivot rod and lift rod. Look under the sink for the horizontal pivot rod going into the drain pipe — squeeze the clip and pull it out. Then unscrew the lift rod from the faucet body.
Remove the mounting nuts. The faucet is held to the sink by one or more mounting nuts on the underside. These are often in very tight spaces — a basin wrench is the right tool here. Turn counterclockwise to loosen. On single-hole faucets, there’s usually one large nut. On 3-hole faucets, there’s one nut per handle plus a center body nut.
Lift out the old faucet. Once the nuts are off, the faucet lifts straight out from the top. It may be stuck with old plumber’s putty — wiggle gently to break the seal.
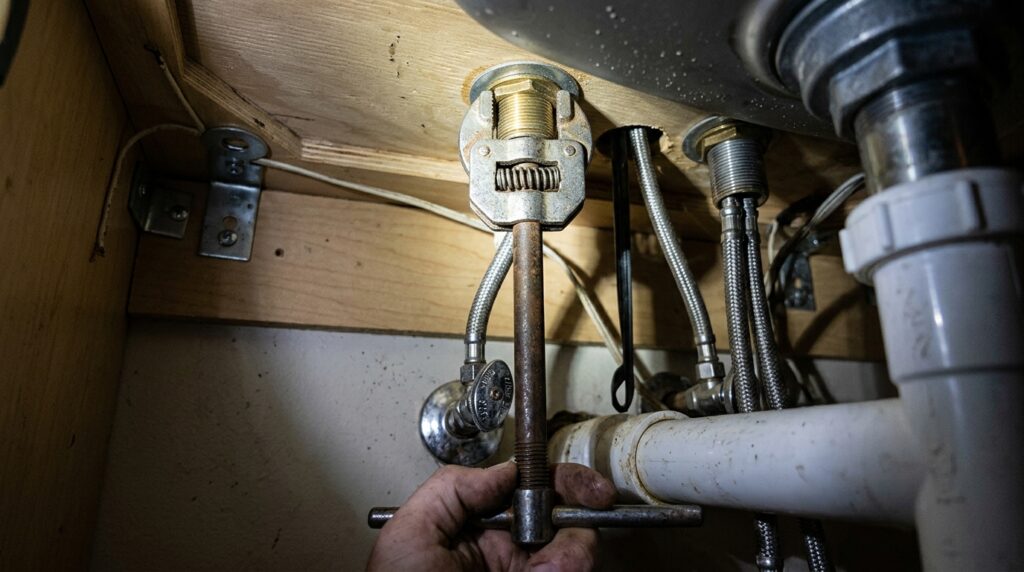
💡 Pro tip: Take a photo of the drain linkage assembly before disconnecting it. It’s easy to forget how the pivot rod, clevis strap, and clip connect when reassembling with the new faucet.
Step 3: Clean the Sink Surface
Old plumber’s putty, mineral deposits, and grime accumulate under faucets over years. The new faucet needs a clean, flat surface to seal properly.
Scrape off old putty or caulk. Use a plastic putty knife to remove as much as possible. For stubborn residue, a few drops of mineral spirits on a rag helps dissolve old putty without damaging the sink.
Clean with a bathroom cleaner. Scrub the faucet holes and surrounding area. Dry thoroughly before installing the new faucet.
Inspect the drain. While the faucet is off, check the pop-up drain stopper and the pivot rod assembly for wear. If the stopper is slow or the rubber is deteriorating, replace the drain assembly now — it’s much easier with the faucet out of the way.
Step 4: Install the New Faucet
Follow your faucet’s included instructions for the specific mounting hardware — they vary by manufacturer and model. The general process:
Apply plumber’s putty or use the gasket. Most modern faucets include a rubber or plastic gasket that seals against the sink — no putty needed. If yours requires putty, roll a rope of plumber’s putty and press it under the faucet base before setting it in place. Don’t use putty on granite or marble — it can stain.
Set the faucet into the sink holes. Lower the faucet body into place from above. On 3-hole sinks, attach the deck plate first if included.
Secure from below. Have a helper hold the faucet in place from above while you go under the sink to thread on the mounting nuts. Hand-tighten first, then snug with a basin wrench — don’t overtighten, which can crack the sink or strip the threads.
Connect the drain linkage. Thread the lift rod down through the faucet body. Connect the clevis strap and pivot rod following the new faucet’s instructions. Test the stopper operation by pulling up on the lift rod — the stopper should close; pushing down should open it.
| Faucet type | Mounting holes needed | Notes |
| Single-handle | 1 hole (or 3-hole with deck plate) | Most common — easiest to install |
| Double-handle | 3 holes (4″ or 8″ spread) | Check spread before buying — must match sink |
| Widespread | 3 holes, 8–16″ spread | Handles mount separately from spout |
Step 5: Connect the Supply Lines
Always install new supply lines — never reuse old ones. Braided stainless lines are far more durable than plastic and resist cracking and corrosion.
Wrap threads with Teflon tape. Wrap 2–3 layers of plumber’s tape clockwise around the threaded ends of the faucet tailpieces and the shutoff valve stems. This ensures a watertight seal.
Connect the supply lines. Screw the supply lines to the faucet tailpieces (hot to left, cold to right) and to the shutoff valves. Hand-tighten first, then snug with an adjustable wrench — about a quarter turn past hand-tight. Don’t overtighten; you’ll crush the rubber washer inside.
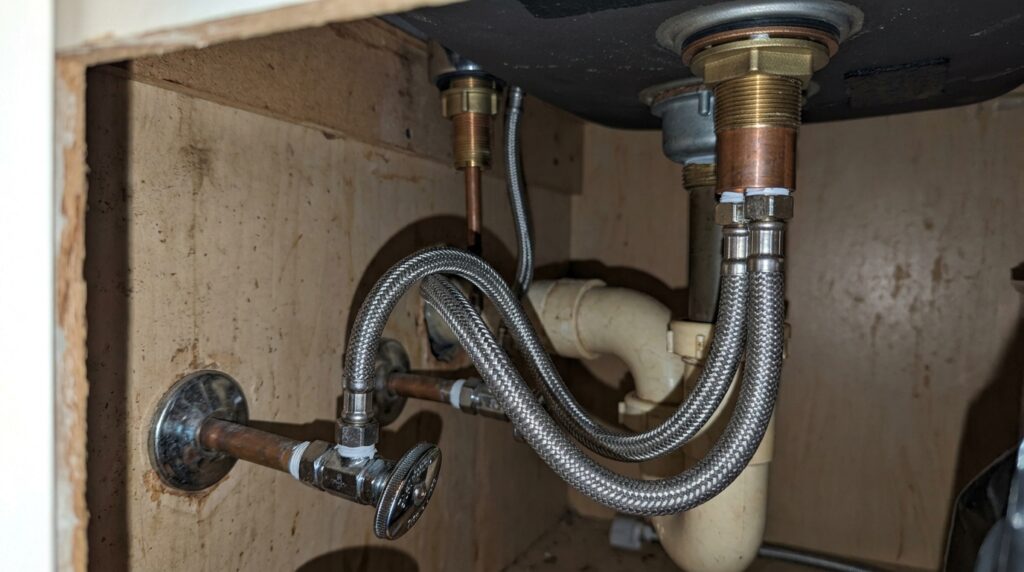
⚠️ Hot is always left, cold is always right — on the faucet and at the valves. Connecting them backwards won’t damage anything immediately, but your hot and cold handles will be reversed. Double-check before tightening.
Step 6: Test for Leaks
Turn on the supply valves slowly. Open the valves gradually — a quarter turn at a time. Watch each connection as water pressure builds.
Check every connection. With water flowing, inspect each supply line connection at both the faucet and the valve. Dry your hand and run a finger around each joint — even a slow drip will show up.
Test the faucet. Turn the faucet on and off several times. Check for leaks around the base of the faucet, at the handles, and at the spout.
Test the drain stopper. Fill the sink partially and let the stopper hold water for 30 seconds. It should seal without leaking. Then open it and verify it drains freely.
If you find a leak: Turn off the supply valve and tighten the leaking connection by a quarter turn. Retest. If it continues leaking, remove the connection, inspect the threads and washer, re-wrap with Teflon tape, and reconnect.
💡 Pro tip: Put a piece of white paper or a dry paper towel under each connection after your initial check. Leave it for an hour and check again — slow drips that aren’t visible immediately will show up on dry paper.
Common Mistakes to Avoid
Not replacing the supply lines. Old plastic supply lines crack and fail — often when you’re not home. Always install new braided stainless lines when replacing a faucet.
Overtightening connections. Hand-tight plus a quarter turn is enough for compression fittings. Overtightening cracks the rubber washer and actually causes leaks rather than preventing them.
Wrong faucet for the sink. Measure your sink holes before buying — specifically the number of holes and the spread (distance between outer holes on a 3-hole sink). Standard spreads are 4″ and 8″. A faucet that doesn’t match won’t install.
Skipping the Teflon tape. Threaded connections without Teflon tape are prone to slow drips. Two wraps of tape is all it takes — don’t skip it.
Forgetting the drain linkage. The pop-up drain stopper needs to be reconnected to the new faucet’s lift rod. It’s easy to overlook until you turn the water on and nothing happens when you pull the stopper.
Frequently Asked Questions
How long does it take to replace a bathroom faucet?
For most homeowners doing it for the first time, plan on 1.5–2.5 hours. The majority of that time is spent under the sink removing the old faucet and making connections. If the old faucet has corroded mounting nuts, add another 30–60 minutes. Experienced DIYers can do the whole job in under an hour.
Do I need to hire a plumber to replace a faucet?
No — replacing a bathroom faucet is a standard DIY job. The only tools you need beyond basic wrenches are a basin wrench (about $20) for reaching under-sink nuts. The job doesn’t require cutting or soldering pipes. If your shutoff valves are corroded and won’t close, that’s when a plumber makes sense — fixing bad valves requires turning off the main supply and may involve soldering.
Can I replace a single-handle faucet with a double-handle, or vice versa?
Yes, as long as the sink holes match. A single-hole faucet requires one hole; a double-handle faucet requires three holes (or one hole plus a deck plate on some models). Most modern faucets include a deck plate that covers extra holes — so you can put a single-handle faucet on a 3-hole sink. Going the other direction (double-handle in a 1-hole sink) requires drilling, which isn’t worth attempting on most sinks.
What’s a basin wrench and do I really need one?
A basin wrench is a specialized tool with a long handle and a pivoting jaw designed specifically for reaching the mounting nuts under a sink — a space that’s too tight for a regular wrench. For most bathroom faucet replacements, you genuinely need one. They cost $15–$25 and make the difference between a 10-minute job and an hour of frustration.
The old shutoff valve under my sink is dripping after I closed it. What do I do?
Shut off the main water supply to the house first. A dripping shutoff valve usually means the valve packing has deteriorated — common on valves that haven’t been operated in years. You can try tightening the packing nut (the nut just below the handle) a quarter turn; sometimes that stops the drip. If it continues, the valve needs to be replaced — that’s a job for a plumber unless you’re comfortable soldering copper pipe.
The Bottom Line
Replacing a bathroom faucet is one of the most straightforward plumbing jobs a homeowner can take on. Shut off the water, swap out the old for the new, connect the supply lines, and test. The result is a faucet that looks and works exactly the way you want it — without a plumber’s bill.
The one tool that makes the biggest difference: a basin wrench. Buy one before you start and the under-sink work goes smoothly. Skip it and you’ll spend most of your time frustrated by unreachable nuts.
Related posts (internal links):