
This post contains affiliate links. If you buy through our links, we may earn a small commission at no extra cost to you.
Most garages become dumping grounds — not because homeowners are disorganized, but because they never set up a system in the first place. Without zones and vertical storage, everything defaults to the floor.
The good news: organizing a garage doesn’t require a weekend renovation or a big budget. It requires one afternoon to declutter, a clear plan for where things go, and a few well-chosen storage solutions to get things off the ground.
Here’s the step-by-step process that actually sticks.
Quick answer: Empty the garage completely, sort into keep/donate/trash, then set up zones by activity (car zone, tools, sports, seasonal). Get everything off the floor with heavy-duty shelving and wall-mounted storage. Label everything. The system works when every item has a specific place to return to.
Step 1: Empty and Declutter First
This is the step people skip — and why their garage fills back up within six months. You can’t organize clutter. You have to reduce it first.
Empty the garage completely. Pull everything out onto the driveway. Yes, everything. This is the only way to see what you actually have and how much space you’re working with.
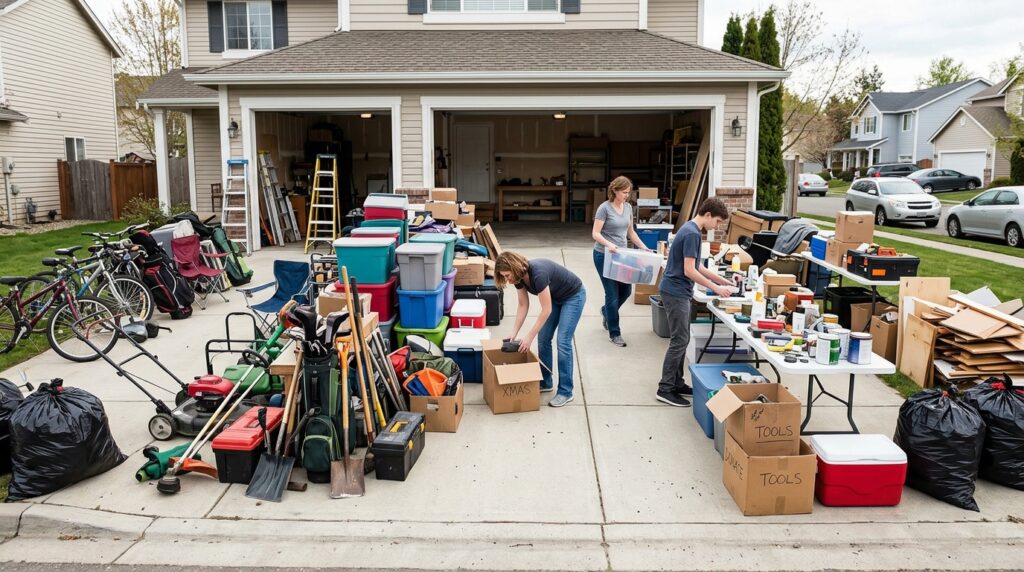
Sort into four categories: Keep, Donate, Sell, and Trash. Be ruthless. If you haven’t used it in two years and it’s not seasonal, it goes. Broken tools, dried-up paint, mystery boxes — trash.
Keep only what belongs in a garage. Garages are for cars, tools, yard equipment, sports gear, and seasonal items. Furniture, boxes of old clothes, and general overflow storage belong in a storage unit — not taking up prime garage real estate.
Deal with paint and chemicals properly. Old paint, pesticides, and motor oil can’t go in regular trash. Check your municipality’s hazardous waste disposal schedule — most areas have free drop-off days.
💡 Pro tip: Take photos of the empty garage from each corner before bringing anything back in. This gives you a clear picture of the actual space and helps you plan zones before items crowd your thinking.
Step 2: Create Zones for Your Garage
A zone system is what separates an organized garage from a reorganized mess. Every category of item gets a dedicated area — and everything in that category lives there and only there.
| Zone | What goes here | Best location |
| Car zone | Car supplies, fluids, jumper cables, ice scraper | Near the garage door, easy access |
| Hand tools | Hammers, screwdrivers, wrenches, levels | Wall-mounted near workbench |
| Power tools | Drills, saws, sanders | Shelf or cabinet near outlet |
| Yard & garden | Rakes, shovels, fertilizer, hoses | Along one wall, tall items upright |
| Sports & recreation | Bikes, balls, helmets, camping gear | One dedicated wall or corner |
| Seasonal storage | Holiday decor, winter gear, camping | High shelves or ceiling storage |
| Trash & recycling | Bins | Near entry door to house |
Put high-frequency items at eye level. Things you grab daily or weekly should be the easiest to reach. Seasonal items go high. Daily-use tools go at arm height.
💡 Pro tip: Map your zones on paper before moving anything back in. Sketch the garage footprint and assign each wall and area. Five minutes of planning prevents hours of rearranging.
Step 3: Get Things Off the Floor
Floor space is prime real estate in a garage. Every item on the floor creates visual chaos, makes sweeping impossible, and takes up space that could fit your car. The goal is to get as much as possible onto walls and shelves.
Heavy-duty freestanding shelving. A set of wire or steel shelving units along one wall transforms a garage. Look for units rated for 200–250 lbs per shelf. Place them against the back wall or side walls — never where they block the car doors from opening fully.
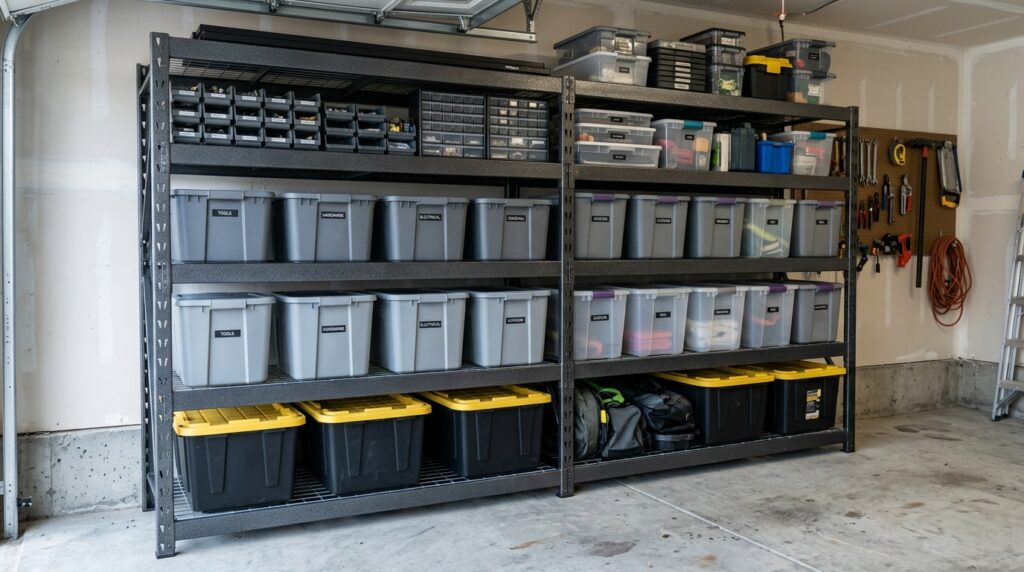
🔗 Our Top Pick: Ironton 4-Tier Industrial Steel Shelving Unit (Amazon)
Ceiling storage for seasonal items. Overhead ceiling racks use dead space above the car for seasonal items — holiday boxes, camping gear, sports equipment. Most ceiling racks mount to joists and hold 250–600 lbs. Measure your ceiling height first — you need at least 4 feet of clearance above the rack for the garage door to operate.
🔗 Our Top Pick: FLEXIMOUNTS 3×6 Overhead Garage Storage Adjustable Ceiling Rack (Amazon)
Get bikes off the floor. Bikes are the biggest floor-space killers in most garages. A wall-mounted bike hook or a ceiling pulley system gets them vertical and frees up significant floor area.
💡 Pro tip: When loading shelves, put the heaviest items on the bottom two shelves. Top-heavy shelving units tip — especially important if you have kids in the garage.
Step 4: Use Wall Space Efficiently
Walls are the most underused storage surface in a garage. A well-organized garage uses every inch of vertical wall space for tools, equipment, and supplies.
Pegboard for hand tools. A 4×4 or 4×8 sheet of pegboard mounted above the workbench gives you a visible, accessible home for every hand tool. The key is to outline each tool’s spot with a marker — so you immediately know what’s missing and where it goes back.
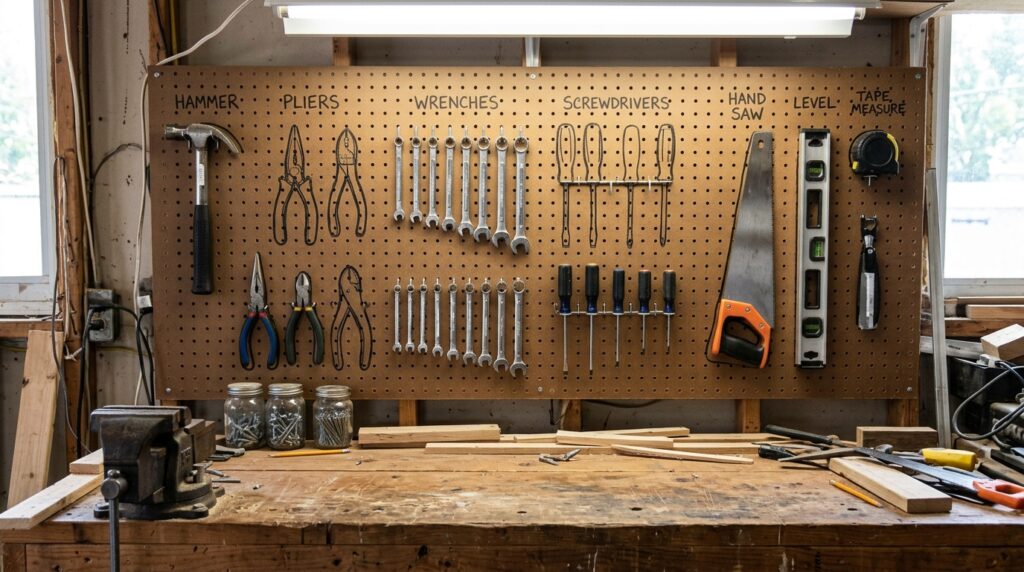
🔗 Our Top Pick: House Again 48×24″ Pegboard Wall Organizer Kit (Amazon)
Slatwall panels for flexible storage. Slatwall systems accept interchangeable hooks, bins, and shelves — you can reconfigure as your needs change. More expensive than pegboard but more versatile and cleaner-looking.
Long-handled tool storage. Rakes, shovels, brooms, and garden tools need vertical storage. A wall-mounted tool rack or simple hooks keep them upright and accessible without falling over.
Cabinets for hazardous materials. Motor oil, pesticides, fertilizers, and paint should be stored in a lockable cabinet — especially if you have children. A basic metal cabinet works well and can be locked.
Step 5: Organize What’s Left on the Floor
After shelving and wall storage, some things inevitably stay on the floor — the car itself, trash bins, large power tools. Here’s how to handle what remains.
Use stackable bins for small items. Hardware, sporting goods, seasonal gear, and miscellaneous items belong in labeled stackable bins on shelves — not loose on surfaces. Clear bins let you see contents without opening every box.
🔗 Our Top Pick: IRIS USA Stackable Storage Bins with Lids (Amazon)
Label everything. Every bin, every shelf zone, every cabinet section gets a label. This isn’t just for you — it’s for everyone in the household. If items don’t have a labeled home, they end up wherever there’s space.
Floor markings for the car. Put a tennis ball on a string from the ceiling, or use floor tape to mark where the front bumper should stop. This prevents the car from being parked too far in or at an angle that blocks walkways.
Keep a 3-foot path around the car. This is the minimum clearance for opening car doors, accessing shelves, and moving through the garage safely. Design your layout around this requirement — not as an afterthought.
Maintenance — How to Keep It Organized
The difference between a garage that stays organized and one that reverts to chaos is a maintenance system — not willpower.
The one-in-one-out rule. Every time something new comes into the garage, something leaves. This prevents slow accumulation that eventually overwhelms the system.
Annual declutter. Once a year — spring is ideal — do a quick pass through every zone. Pull anything that hasn’t been used in 12 months and decide: does it stay or go?
Return items immediately. The system only works if items go back to their labeled spot after every use. A tool left on the workbench becomes a pile within a week. This is the single habit that determines whether a garage stays organized.
Don’t let the floor become temporary storage. The floor is for the car and walking. The moment items start accumulating on the floor, the system is breaking down. Address it immediately before it cascades.
Frequently Asked Questions
How long does it take to organize a garage?
A full garage organization project — empty, declutter, install storage, put everything back — takes most homeowners 1–2 full days. Day 1 is decluttering and planning; Day 2 is installing storage and organizing. If you’re starting with a heavily packed garage, add a half day. The storage installation is actually the fastest part — decluttering takes the longest.
How much does it cost to organize a garage?
A basic garage organization with one shelving unit, pegboard, and bins runs $150–$300 in materials. A more complete setup with ceiling storage, slatwall, and cabinets runs $500–$1,500. You don’t need to do everything at once — start with a shelving unit and pegboard, then add over time as budget allows.
What’s the best garage shelving?
For most homeowners, steel wire shelving (like Gladiator or Edsal) in the 77-inch height range offers the best combination of capacity, durability, and price. Look for units with at least 200 lbs per shelf rating and adjustable shelf heights. Solid steel shelving is stronger than wire but heavier and more expensive — worth it for heavy tools and equipment.
Should I park my car in the garage or use it for storage?
Park the car. A car parked outside loses value faster from weather exposure, and most homeowners significantly underestimate how much they spend on paint correction, interior UV damage, and winter weathering over 5–10 years. The garage is for the car first — everything else works around that constraint.
How do I store seasonal items in a garage?
Seasonal items — holiday decorations, winter sports gear, camping equipment — belong in clearly labeled bins on high shelves or ceiling storage racks. Clear bins with lids keep moisture out and let you see contents without opening every box. Group by season and label the outside of each bin with the season and general contents.
The Bottom Line
An organized garage comes down to three things: less stuff, more vertical storage, and a labeled place for everything. The declutter step is the hardest — once you’ve committed to keeping only what you actually use, the rest of the organization follows naturally.
Start with a shelving unit and pegboard, assign zones, and label everything. Maintain it with the one-in-one-out rule and an annual declutter. A garage that was chaos in the morning can be functional and clean by evening.
Related posts (internal links):