
This post contains affiliate links. If you buy through our links, we may earn a small commission at no extra cost to you.
That cracked, moldy caulk line around your tub isn’t just ugly — it’s letting water behind the wall every time you shower. Left alone, it leads to mold, rot, and repairs that cost hundreds more than a $10 tube of caulk.
Recaulking a bathtub is a 2-hour job that any homeowner can do. The result looks professional and lasts 5–10 years if you do it right. The key is prep — specifically, removing every trace of old caulk and getting the surface bone dry before you apply anything new.
Here’s the complete process.
Quick answer: Remove all old caulk with a caulk remover tool and softener. Clean the joint with rubbing alcohol and let it dry completely — 24 hours minimum. Tape both sides of the joint, fill the tub with water before caulking (so it’s weighted down), apply a steady bead of silicone caulk, smooth with a wet finger, remove tape immediately, and don’t use the tub for 24 hours.
What You’ll Need
- Caulk remover tool or utility knife — for scraping out old caulk
- Caulk softener spray (optional but helpful) — Dap Caulk-Be-Gone or similar
- Rubbing alcohol or denatured alcohol — for final surface cleaning
- Clean rags or paper towels
- Painter’s tape — for clean lines
- Silicone caulk (kitchen & bath formula, mold-resistant)
- Caulk gun
- A small cup of water — for smoothing
🔗 Our Top Pick: GE Sealants Advanced Silicone 2 Kitchen & Bath Caulk (Amazon)
🔗 Our Top Pick: Homax Caulk Remover Tool (Amazon)
🔗 Our Top Pick: ScotchBlue Painter’s Tape (Amazon)
| Caulk type | Best for | Notes |
| 100% silicone | Bathtubs and showers | Most durable, waterproof, mold-resistant — harder to tool but lasts longest |
| Siliconized latex (paintable) | Areas you’ll paint over | Easier to apply, less durable in wet areas |
| Acrylic latex | Baseboards, window trim | Not for wet areas — will crack and mold quickly around tubs |
⚠️ Never apply new caulk over old caulk. It won’t bond properly and will fail within months. Complete removal of old caulk is non-negotiable.
Step 1: Remove All the Old Caulk
This is the most time-consuming part — and the most important. New caulk applied over old caulk or a dirty surface won’t adhere and will peel within weeks.
Apply caulk softener (optional): Spray a caulk softener like Dap Caulk-Be-Gone along the old caulk line and let it sit for 2–3 hours. This softens even old, hardened silicone and makes removal much easier.
Score with a utility knife: Run a utility knife along both edges of the caulk bead — where it meets the tub and where it meets the wall tile. Cut as close to the surface as possible without scratching.
Pull out the bulk: Grip the caulk with needle-nose pliers or your fingers and pull it out in strips. Old silicone often comes out in satisfying long pieces.
Scrape residue: Use a plastic caulk remover tool to scrape any remaining bits from both surfaces. Avoid metal scrapers on acrylic or fiberglass tubs — they scratch permanently. For tile, a metal scraper is fine.
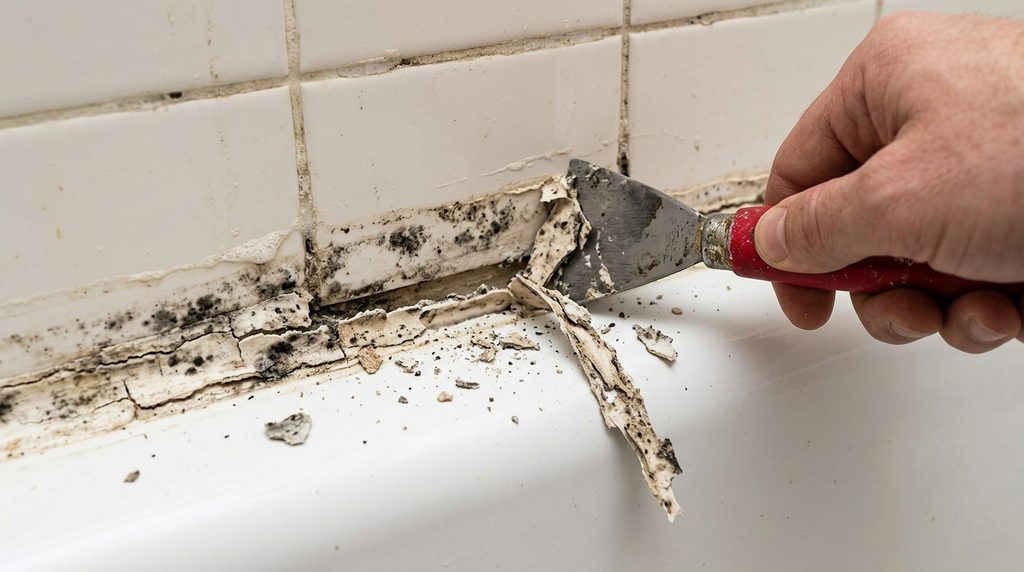
Clean the joint: Wipe the entire joint with rubbing alcohol on a clean rag. This removes soap scum, oils, and residue that would prevent adhesion. Let it dry completely.
💡 Pro tip: Use a can of compressed air to blow out any debris from inside the joint gap. Bits of old caulk trapped in the gap will prevent a good seal.
Step 2: Clean and Dry the Surface Completely
This step is where most recaulking jobs fail. Silicone caulk will not adhere to a damp surface — even slightly damp. You need the joint bone dry before applying anything.
Clean thoroughly: Scrub the tub surround with a bathroom cleaner to remove soap scum, body oils, and mildew. Rinse well.
Wipe with alcohol: Do a final wipe of the joint area with rubbing alcohol. This is the most important cleaning step — alcohol removes the invisible film of oils that prevents caulk adhesion.
Dry completely: Leave the tub unused for at least 24 hours with good ventilation. Run a fan in the bathroom if possible. The joint must be completely dry — not just surface dry, but dry deep in the gap.
⚠️ 24 hours of drying time is not an exaggeration. Applying silicone to a damp surface is the #1 reason recaulking jobs fail within months. If you’re in a humid climate or the bathroom has poor ventilation, wait longer.
Step 3: Tape the Joint for a Clean Line
Painter’s tape on both sides of the joint gives you a straight, professional-looking caulk line and makes cleanup much easier. This step takes 5 minutes and makes a visible difference in the final result.
Apply tape to the tub surface: Run a strip of painter’s tape along the tub, parallel to the joint, leaving about 1/8″ to 3/16″ of the tub exposed. Press the edge down firmly.
Apply tape to the wall: Run a second strip along the tile or wall surface, leaving the same gap. The exposed gap between the two tape lines is where your caulk bead will go.
Press edges firmly: Run your fingernail along both inner tape edges to seal them tightly. Any gap under the tape edge lets caulk bleed through and creates a ragged line.
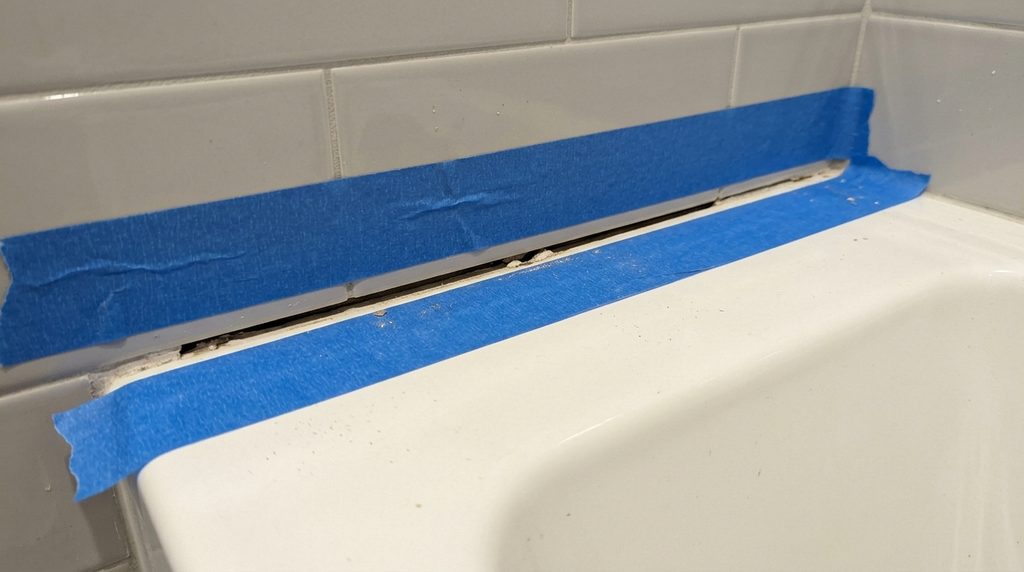
💡 Pro tip: Use blue painter’s tape, not masking tape. Masking tape is harder to remove cleanly and can pull up fresh caulk if you don’t remove it at exactly the right moment.
Step 4: Apply the Caulk
Fill the tub with water first. This is a pro trick most guides skip: fill the bathtub with water before caulking. The weight of the water pushes the tub down to its lowest position. When you drain it later, the tub rises slightly — and pulls the caulk into compression rather than tension. This dramatically extends the life of the seal.
Cut the nozzle at a 45-degree angle. Cut the tip of the caulk tube to create an opening about 3/16″ wide. Smaller is better — you can always go wider, but a too-large opening gives you less control.
Puncture the inner seal. Most caulk tubes have a foil seal inside the nozzle. Use a long nail or the puncture tool on the caulk gun to break it.
Apply in one steady pass. Hold the caulk gun at a 45-degree angle to the joint, nozzle pointing into the gap. Apply steady pressure on the trigger and move at a consistent speed — aim for one continuous bead from one end to the other without stopping.
Work in sections if needed. For long runs, work in 3–4 foot sections and smooth each section before moving to the next. Silicone starts skinning over in 5–10 minutes.
💡 Pro tip: Consistent speed = consistent bead size. Moving too slowly gives you too much caulk; too fast gives you too little. Practice on a scrap surface first if you’ve never used a caulk gun.
Step 5: Smooth and Finish
Wet your finger. Dip your index finger in the cup of water. Wet finger slides over silicone smoothly; dry finger drags and pulls the bead apart.
Tool the bead in one stroke. Place your wet finger at one end of the bead and draw it along the joint in one smooth, continuous motion, pressing the caulk into the gap and creating a concave profile. Don’t go back and forth — one pass is enough.
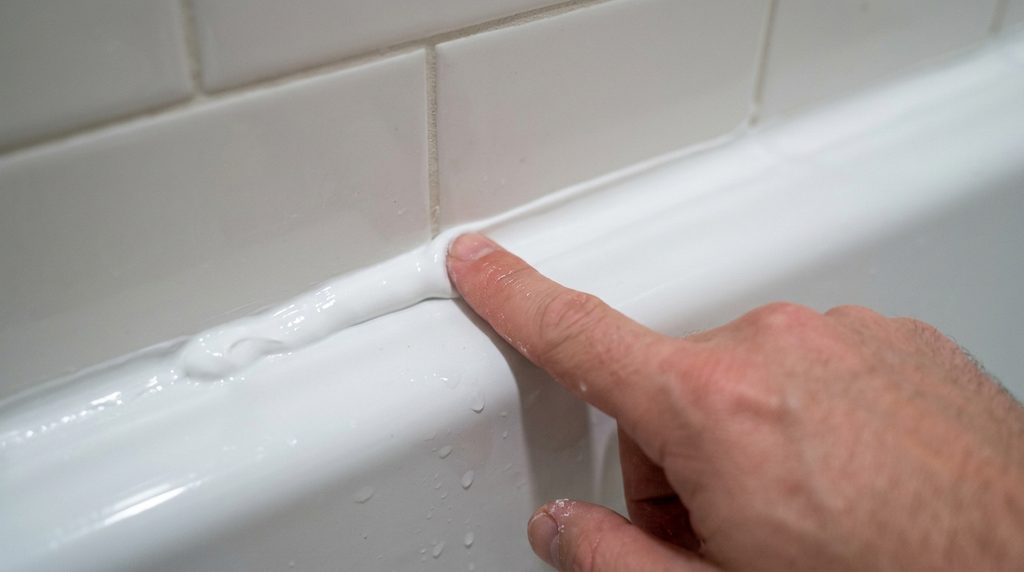
Remove the tape immediately. Pull the painter’s tape off while the caulk is still wet — within 1–2 minutes of applying. Pull at a 45-degree angle away from the joint. Waiting too long causes the caulk to skin over and tear when you pull the tape.
Clean up excess. Wipe away any smears immediately with a damp cloth. Silicone that cures on tile or tub surfaces is very difficult to remove later.
⚠️ Remove the tape before the caulk skins over. If you wait too long, the tape will tear the caulk bead when you pull it, leaving a ragged edge. Work quickly after smoothing.
How Long to Wait Before Using the Tub
| Caulk type | Skin-over time | Full cure time |
| 100% silicone | 5–10 minutes | 24–48 hours |
| Siliconized latex | 15–30 minutes | 24 hours |
| Acrylic latex | 30–60 minutes | 24 hours |
Don’t use the tub for at least 24 hours after caulking — 48 is better for silicone. The caulk needs to cure completely before getting wet. Using the tub too soon is the most common reason a fresh caulk job fails within weeks.
Remember to drain the tub after the caulk has cured. You filled it with water before caulking — drain it now that the job is done.
Why Caulk Fails (and How to Prevent It)
Applied over old caulk. New caulk won’t bond to old caulk. Always remove everything first.
Surface wasn’t dry. Silicone needs a completely dry surface to bond. Even slight moisture prevents adhesion.
Wrong caulk type. Acrylic or paintable caulk in a wet area will crack and mold within months. Use 100% silicone or a silicone-fortified bath caulk.
Tub wasn’t weighted when caulking. Skipping the fill-with-water step means the caulk cures under no load — then stretches and cracks when the tub fills and sinks under the weight of water and a person.
Joint was moving. If the tub or surround has structural movement — loose tile, flexible walls — caulk will crack regardless. Fix the underlying movement problem first.
Frequently Asked Questions
How often should you recaulk a bathtub?
Every 5–10 years with good quality silicone, properly applied. Signs it’s time to recaulk: visible cracks, areas where the caulk has pulled away from the surface, black mold that won’t clean off, or caulk that feels soft or spongy. Don’t wait until water is actively leaking behind the wall.
Can I caulk over existing caulk?
No — not if you want the job to last. New caulk applied over old caulk doesn’t bond to the surface, only to the old caulk. It will peel within months. Complete removal is required for a caulk job that lasts years.
What’s the best caulk for a bathtub?
100% silicone kitchen and bath caulk is the most durable option for bathtubs and showers. GE Sealants Advanced Silicone 2 and DAP 100% Silicone are both reliable products. Look for ‘mold and mildew resistant’ on the label. Avoid acrylic or paintable caulks in wet areas — they’re not designed for the constant moisture exposure.
How do I remove black mold from caulk?
If the mold is on the surface, try a bleach-based bathroom cleaner and let it sit for 15–20 minutes before scrubbing. If the mold is inside or behind the caulk (black spots that won’t clean off), the caulk needs to be fully removed and replaced. Mold that has penetrated the caulk can’t be cleaned — it will regrow.
Can I use silicone caulk in a shower?
Yes — silicone is actually the best choice for showers and tubs. It’s waterproof, flexible, and highly resistant to mold and mildew. Use a bath-specific silicone that’s labeled for wet areas and contains a mildewcide.
The Bottom Line
Recaulking a bathtub is one of the highest-value DIY tasks in the bathroom — it costs under $20 in materials and takes an afternoon, but prevents water damage that can cost thousands to repair.
The process is simple: remove everything, get it dry, tape for clean lines, fill the tub before applying, apply one steady bead, smooth with a wet finger, pull the tape immediately, and wait 24 hours. Do those steps in order and the result will look professional and last for years.
Related posts (internal links):